|
|
| ENGINE COMPARTMENT DETAILING
|
|
Detailing an engine compartment can be a weekend project. Depending on how close to concours correct you want to achieve, you could spend anywhere from $100 - 500 improving your engine compartment. $300 will do a nice job.
|
| WHAT YOU WILL NEED
|
|
Assuming you're not going to remove the engine, nor spray paint from a gun, for a good quality job that you can do yourself over a weekend, you'll need:
|
| PAINT
|
|
While some swear by Krylon, I prefer the Eastwood paints like Under Hood Black. They are a little more expensive, due to the high quality achieved via high paint solids content, coverage is superior, and you'll need less paint. There are several excellent products available, so you may want to ask at car shows, or buy
a few and test them out for yourself.
|
| PARTS
|
|
- Tune-up parts if needed
- Distributor Cap, points, rotor, ignition wires, spark plugs
- Belts (Fan, P/S, A/C)
- Hoses (Upper/Lower Radiator, heater, vacuum)
- Fan Shroud - if appropriate
- Gaskets, sealer
|
| SUPPLIES
|
|
| Notebook & Camera |
30 gallon Trash Bag |
| Ziplock Bags |
Indelible marker |
| Wire hangers/twisties |
Scotchbrite Pads |
| Assorted Sandpaper |
Newspapers |
| Masking tape |
Small paint brushes |
| Testor's Model paints |
Wire brush |
| Fantastic/409 |
Simple Green |
| Tar & Bug Remover |
Engine Degreaser |
| Kerosene |
Brake / Carb Cleaner |
| Cardboard boxes |
Old towels / blanket |
| Fender protector |
|
|
| DISASSEMBLY
|
|
Run the engine to get it warm, then degrease your engine using a brush to remove as much dirt and grime as you can. A Power washer, steam cleaner or high-pressure do-it-yourself car wash works well. Photograph the way everything is connected while it's still running; get a notebook, make a diagram, take notes, etc.
Remove all the accessories, hoses, belts and wires. Keep the distributor wires attached to the cap. If you're really going nuts, drain and remove the radiator and unbolt the exhaust manifolds from the block and the rest of the exhaust system. Bag and tag everything that comes off, using the Ziplock bags for small items, with clear labels, i.e. Exhaust manifold bolts 16 7/16. Large items get a making tape tag.
Remove the battery tray, solenoid, voltage regulator, alternator, brackets, and little things like the windshield washer reservoir & pump. The engine compartment brace(s) should come off too. If removing the radiator, be sure to drain the coolant into an oil pan or other container and dispose of properly. Don't let it spill on the ground; it will kill your pets. And don't reuse it. If you're thinking about having the radiator tested, cleaned, or recored, now is the time.
Remove or cover the distributor. Wire brush (brass works best) the iron areas of the block that have rust or scale. Try Scotchbrite if necessary on softer finishes. Use compressed air to blow the dust created off. If necessary use some kerosene on a brush or rag to remove grease or grime remaining.
|
| GETTING IT DONE
|
|
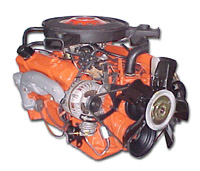
Paint the motor first. Pick a warm dry day. Remove the air cleaner, stove pipes, carb, and valve covers, and set them aside for separate refinishing. Prep the block surface by removing any rust, loose paint, scale, etc. with a wire brush. Stuff paper towels in the intake manifold holes. Get the wires & hoses not removed out of the way. While engine compartment detailing is easier with the hood off, it's doable with the hood on. Once the surface is clean enough to paint, cover the engine compartment walls with cardboard, towels, etc. and make sure the fenders are covered. Spend time taping and covering the areas you don?t want to paint. Paint the motor with even strokes from 6-10". If you removed the valve covers, use a strip of cardboard to cover the valve train. Give it a second coat when dry. A good prep job plus a high quality paint will yield a wet look when dry.
Paint the air cleaner and valve covers while the block is drying. Sandblast or strip these parts after degreasing. The better the prep, the better the results. You may choose to bang-out or body work any dents in these parts (the reason for removing them). Paint on cardboard, constructing paint stands from the cardboard boxes and wire hangers. Paint the interior of the air cleaner, including the lid bottom. Do not paint the inside of the valve covers. Two coats of paint on each part.
When dry, remove the cardboard & rags. Cover the motor with a trash can bag; two if possible. Use Scotchbrite to scuff the walls of engine compartment. If the walls have heavy rust or scale, you may wish to use a rust inhibiting primer like Eastwood's Corroless or POR-15. You're done when it looks good to you. Don't forget the shock tower caps, radiator support, engine brace, battery tray, and exposed frame crossmembers. Most pulleys, engine brackets, and the fan also get the satin black paint. Sandblasting is best, but at least degrease and scuff it. The radiator is actually a more glossy black, like Eastwood's Chassis Black. TIP: when the engine is complete, install the new spark plugs. There's much more room before the exhaust manifolds are in.
If you removed the battery tray, there maybe a rust or even a hole underneath it; this is common. You can repair the hole with a product like POR-15's Patch Putty. A severe rust problem in this area or in other engine compartment walls - called "inner fender aprons" - may necessitate cutting out the rusted metal and welding in replacement sheet metal.
Save the cardboard you used for the walls. If you removed the exhaust manifolds, sandblast or wire brush the rust and scale off. Using a foam brush and the High-Temp exhaust manifold paint, them, and let dry. If you're not going to have them installed on the motor within 72 hours, cure them in an over for 15 minutes at 400-degrees. That is, if you have an extra electric oven. Don't use the oven in your home! The makers of POR-15 make a high temperature coating like the EW product that appears to allow a week or two between application and curing.
Put the cardboard in place over the walls to protect your newly painted finish, remove the garbage bag and install. Then hook up the rest of the exhaust system.
The hood latch & catch, hinges & springs, coil bracket, master cylinder body, and steering gear body get the natural metal paint (EW Spray Gray). From your notes, you'll see what parts were gold cad, silver cad (a bluish tint on a silver part), etc. Refinish as you see fit. Then, you get to put it all back together!
|
| REASSEMBLY
|
|
Install the distributor if you removed it. Note - this will require tune-up/timing when finished. Use the Testor's Model paint and a small brush to make a timing mark. Install the fan, alternator, pulleys, and belts. Then add the radiator, shroud, hoses, thermostat, and sending units. Fill with coolant. Install the carburetor. Do all your tune-up & electrical next followed by vacuum and other hose routing. Put your vinyl dressing on before attaching the hoses. Add the battery, if not in already. If you bought a new repro, it came dry, and you'll need to add battery acid. You might want to set this up the night before.
Detailing touches are next like decals, wax, and polish.
Now you get to start it, tune-it and fool with it. Especially if you removed the distributor. Make sure your wires are correctly attached. Label each wire with masking tape and the cylinder #, then remove all wires from the spark plugs, leaving them attached to the distributor cap. Then match the new wires by length on the new cap, just like the old one. If the carb was properly set before, it should be properly set now; don't touch it.
I am sure I missed something, but this is the basic procedure. Have FUN!
|
|
|
|
|